NEW

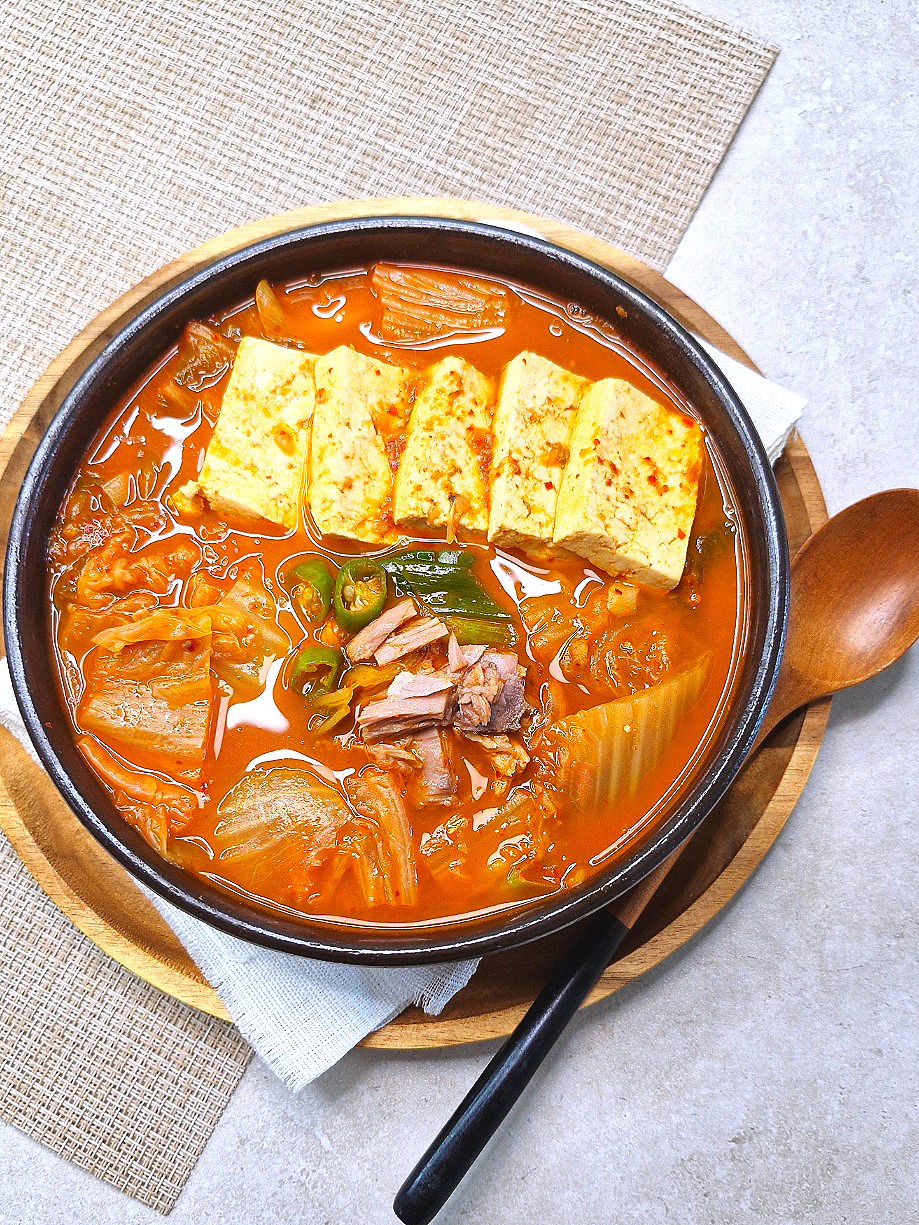
  • Tuna Kimchi Jjigae Recipe (Korean Kimchi Stew with Canned Tuna)

    Tuna Kimchi Jjigae Recipe (Korean Kimchi Stew with Canned Tuna)

    Tuna Kimchi Jjigae is a quick and spicy Korean kimchi stew made with sour kimchi, canned tuna, green onion, kimchi juice, gochugaru, and water.

    This is one of the easiest versions of kimchi stew because canned tuna already adds rich flavor and oil. If your kimchi is well-fermented and sour, the stew becomes deep, spicy, savory, and incredibly satisfying with very little effort.

    It is perfect when you want a fast Korean comfort food that tastes great with steamed rice.


    What is Tuna Kimchi Jjigae?

    Tuna Kimchi Jjigae is a Korean kimchi stew made with canned tuna instead of pork or beef.

    The word “chamchi” means tuna, “kimchi” refers to fermented Korean cabbage, and “jjigae” means stew.

    Compared to pork kimchi jjigae, tuna kimchi jjigae is faster, lighter, and easier to make. It is a popular home-cooked dish in Korea because it uses simple pantry ingredients and can be ready in about 10 minutes.

    The most important ingredient is sour kimchi. If the kimchi is properly fermented, the stew already has a strong flavor base.


    Recipe Information

    Prep Time: 5 minutes

    Cook Time: 10 minutes

    Total Time: 15 minutes

    Servings: 2

    Difficulty: Easy

    Cuisine: Korean

    Main Ingredient: Sour kimchi and canned tuna

    Best Served With: Steamed white rice


    Ingredients

    Main Ingredients

    1 soup bowl sour kimchi

    1 can tuna

    1 green onion

    3 tbsp cooking oil

    1 tbsp gochugaru

    3 tbsp kimchi juice

    400ml water

    Optional Ingredient

    1 tsp minced garlic


    Ingredient Notes

    Sour Kimchi

    Sour, well-fermented kimchi is the key to delicious kimchi jjigae.

    Fresh kimchi can taste too light or flat in stew.

    If your kimchi is not sour enough, sprinkle 1 tablespoon of vinegar over the kimchi and let it sit for about 10 minutes before cooking.


    Canned Tuna

    Use regular canned tuna in oil for the richest flavor.

    Do not discard the tuna oil. Adding the oil to the stew gives the broth more depth and a richer taste.


    Kimchi Juice

    Kimchi juice adds acidity, saltiness, and fermented flavor.

    It makes the stew taste deeper and more like traditional kimchi jjigae.


    Gochugaru

    Gochugaru adds color, heat, and a clean chili flavor.

    Add it near the end to make the stew look more vibrant and taste spicier.


    Green Onion

    Green onion adds freshness and aroma.

    Add it toward the end so the flavor stays bright.


    How to Make Tuna Kimchi Jjigae

    Step 1: Prepare the Ingredients

    Prepare sour kimchi, canned tuna, green onion, cooking oil, gochugaru, kimchi juice, and water.

    Slice the green onion.

    If the kimchi pieces are too large, cut them into bite-sized pieces.


    Step 2: Add Kimchi to the Pot

    Place one soup bowl of sour kimchi into a pot.

    If your kimchi is not sour enough, add 1 tablespoon of vinegar and let it rest for about 10 minutes before cooking.


    Step 3: Stir-Fry the Kimchi

    Pour 3 tablespoons of cooking oil over the kimchi.

    Turn the heat to low-medium or medium heat.

    Stir-fry the kimchi until it softens slightly and turns a brighter orange-red color.

    This step helps deepen the flavor of the stew.


    Step 4: Add the Tuna

    Add 1 can of tuna to the pot.

    Add the tuna oil as well.

    Stir-fry the kimchi and tuna together briefly.

    Be gentle when stirring so the tuna does not break apart too much.


    Step 5: Add Water

    Pour in 400ml of water.

    Bring the stew to a boil.


    Step 6: Add Kimchi Juice

    Add 3 tablespoons of kimchi juice.

    Boil the stew well so the kimchi, tuna, and broth flavors blend together.


    Step 7: Add Green Onion and Optional Garlic

    Add the sliced green onion.

    If you like garlic flavor, add 1 teaspoon of minced garlic.

    Boil briefly.


    Step 8: Add Gochugaru

    Add 1 tablespoon of gochugaru.

    Stir gently and continue boiling until the broth becomes spicy, red, and flavorful.


    Step 9: Serve

    Turn off the heat.

    Serve hot with steamed white rice.

    This stew is also delicious with ramen noodles added to the broth.


    Pro Tips

    Use Sour Kimchi

    The better the kimchi, the better the stew.

    Sour kimchi gives the broth deep, fermented flavor.


    Do Not Throw Away the Tuna Oil

    The oil from canned tuna adds richness to the stew.

    It also helps balance the sharp acidity of sour kimchi.


    Stir-Fry the Kimchi First

    Do not simply boil the kimchi in water.

    Stir-frying kimchi in oil first makes the stew taste deeper and richer.


    Add Kimchi Juice

    Kimchi juice is one of the easiest ways to intensify the flavor.

    It adds sourness, saltiness, and fermented depth.


    Add Gochugaru Near the End

    Adding gochugaru near the end gives the stew a brighter red color and a stronger spicy flavor.


    Add Ramen Noodles

    If there is enough broth left, add ramen noodles and boil again.

    Tuna kimchi jjigae broth works extremely well with ramen noodles.


    What to Serve with Tuna Kimchi Jjigae

    Tuna Kimchi Jjigae pairs well with:

    • Steamed white rice
    • Fried egg
    • Roasted seaweed
    • Gyeran Jjim
    • Gamja Jorim
    • Dubu Jorim
    • Oi Muchim
    • Musaengchae
    • Korean rolled omelet
    • Ramen noodles

    This stew is flavorful enough to eat with just rice and a simple side dish.


    Storage Tips

    Store leftover Tuna Kimchi Jjigae in an airtight container in the refrigerator.

    It is best eaten within 2 days.

    Reheat it in a small pot over medium heat until fully hot.

    If the stew becomes too salty or thick after storage, add a small amount of water while reheating.

    Freezing is not recommended because the tuna texture may become dry after thawing.


    Frequently Asked Questions

    Can I make Tuna Kimchi Jjigae with fresh kimchi?

    Yes, but sour kimchi tastes better.

    If your kimchi is fresh, add 1 tablespoon of vinegar and let it sit for about 10 minutes before cooking.


    Should I drain the canned tuna?

    No.

    For this recipe, use the tuna oil as well. It adds richness and flavor to the stew.


    Can I add tofu?

    Yes.

    Tofu goes very well with Tuna Kimchi Jjigae.

    Add sliced tofu after adding the water and simmer gently.


    Can I make it spicier?

    Yes.

    Add more gochugaru or sliced Cheongyang chili pepper.


    Can I add ramen noodles?

    Yes.

    If there is enough broth, add ramen noodles and boil until the noodles are cooked.

    This is a popular and satisfying way to enjoy the leftover broth.


    Why does my kimchi jjigae taste bland?

    The kimchi may not be sour enough, or the stew may need more kimchi juice.

    Use well-fermented kimchi, add kimchi juice, and stir-fry the kimchi before adding water.


    Can I use tuna in water instead of tuna in oil?

    Yes, but the stew will taste lighter.

    If using tuna in water, you may want to add a little more cooking oil when stir-frying the kimchi.


    Final Thoughts

    Tuna Kimchi Jjigae is one of the fastest and easiest Korean stews you can make at home.

    With sour kimchi, canned tuna, kimchi juice, gochugaru, green onion, and water, you can make a spicy and comforting Korean stew in about 10 to 15 minutes.

    The key is simple: use sour kimchi, stir-fry it first, add the tuna oil, and finish with kimchi juice and gochugaru.

    If you want a quick Korean comfort food that tastes rich, spicy, and perfect with rice, this Tuna Kimchi Jjigae recipe is a perfect choice.
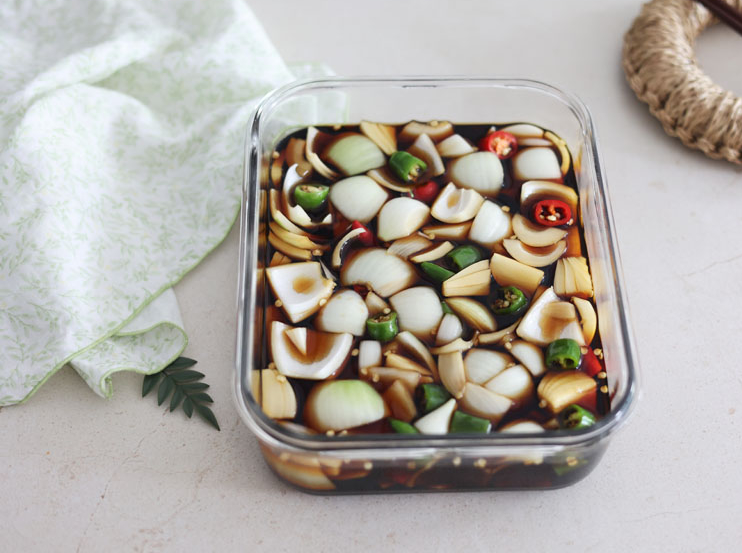
  • Pickled Onion Recipe (Korean Soy Sauce Onion Pickles)

    Pickled Onion Recipe (Korean Soy Sauce Onion Pickles)

    Pickled onions are a simple Korean-style side dish made with onions and a sweet, tangy soy sauce brine.

    This recipe is very easy because the brine follows a simple ratio: water, soy sauce, vinegar, and sugar. Once you know the ratio, you can easily adjust the amount depending on how many onions you want to pickle.

    These Korean pickled onions are crisp, sweet, salty, and refreshing. They pair especially well with grilled meat, Korean BBQ, fried foods, rice bowls, and everyday Korean meals.


    What are Korean Pickled Onions?

    Korean pickled onions are onions preserved in a soy sauce-based vinegar brine.

    They are commonly served as a side dish with grilled pork belly, beef, chicken, Korean BBQ, and rich or oily foods.

    The sharpness of the onion becomes milder after soaking in the brine, while the texture stays crisp and refreshing.

    Unlike fermented kimchi, this is a quick pickle. It does not require long fermentation and can be enjoyed after chilling in the refrigerator for about one day.


    Recipe Information

    Prep Time: 10 minutes

    Cook Time: 5 minutes

    Total Time: 15 minutes

    Resting Time: 1 day recommended

    Servings: 4

    Difficulty: Easy

    Cuisine: Korean

    Main Ingredient: Onion

    Best Served As: Korean side dish or Korean BBQ side dish


    Ingredients

    Main Ingredients

    2 onions

    Pickling Brine

    1 cup water

    1/2 cup sugar

    1/2 cup vinegar

    1/2 cup soy sauce


    Pickling Brine Ratio

    The basic ratio for this recipe is:

    Water 2 : Soy Sauce 1 : Vinegar 1 : Sugar 1

    This means that if you want to make a larger batch, simply increase the amount while keeping the same ratio.

    For example:

    • 2 cups water
    • 1 cup soy sauce
    • 1 cup vinegar
    • 1 cup sugar

    This simple ratio makes the recipe easy to remember and easy to scale.


    Ingredient Notes

    Onion

    Use fresh, firm onions.

    Yellow onions, white onions, or sweet onions all work well.

    Cut the onions into bite-sized pieces so they are easy to eat and absorb the brine evenly.


    Soy Sauce

    Soy sauce gives the pickles their salty and savory flavor.

    Regular Korean soy sauce or all-purpose soy sauce works well for this recipe.


    Vinegar

    Vinegar gives the pickled onions their refreshing tangy flavor.

    Regular white vinegar is commonly used, but rice vinegar can also work.


    Sugar

    Sugar balances the saltiness of the soy sauce and the acidity of the vinegar.

    It also helps create the classic sweet-and-sour flavor of Korean pickled vegetables.


    Water

    Water softens the strength of the soy sauce and vinegar.

    This keeps the brine balanced and not too salty or too sour.


    How to Make Korean Pickled Onions

    Step 1: Prepare the Onions

    Peel the onions.

    Cut them into bite-sized pieces.

    Place the cut onions into a clean glass jar or airtight glass container.


    Step 2: Make the Pickling Brine

    In a pot, add:

    • 1 cup water
    • 1/2 cup sugar
    • 1/2 cup vinegar
    • 1/2 cup soy sauce

    Stir lightly.


    Step 3: Boil the Brine

    Place the pot over medium-high heat.

    Bring the brine to a full boil.

    Once it boils, turn off the heat.


    Step 4: Pour the Hot Brine Over the Onions

    Carefully pour the hot brine directly over the prepared onions.

    The brine should be poured while it is still hot.

    This helps the onions stay crisp while allowing the flavor to absorb well.


    Step 5: Cool and Refrigerate

    Let the container cool at room temperature.

    Once cooled, cover with a lid and store in the refrigerator.

    For the best flavor, let the onions sit for at least one day before eating.


    Step 6: Serve

    Serve chilled as a side dish.

    These pickled onions are especially delicious with grilled meat, Korean BBQ, rice, and savory Korean dishes.


    Pro Tips

    Use the 2:1:1:1 Ratio

    The easiest way to remember this recipe is:

    2 parts water, 1 part soy sauce, 1 part vinegar, 1 part sugar.

    Once you know this ratio, you can make any amount you want.


    Pour the Brine While Hot

    Pouring the hot brine over the onions helps keep them crisp.

    It also helps the onion absorb the seasoning faster.


    Use a Glass Container

    A glass jar or glass airtight container is best because the brine contains vinegar and soy sauce.

    Avoid using containers that may absorb strong smells or stain easily.


    Let It Rest for One Day

    You can technically eat the onions after they cool, but they taste much better after one day in the refrigerator.

    The flavor becomes more balanced as the onions absorb the brine.


    Adjust to Your Taste

    If you prefer a sweeter pickle, add a little more sugar.

    If you prefer a sharper taste, add a little more vinegar.

    If you prefer a less salty version, reduce the soy sauce slightly and add a bit more water.


    What to Serve with Korean Pickled Onions

    Korean pickled onions pair well with:

    • Korean BBQ
    • Grilled pork belly
    • Bulgogi
    • Galbi
    • Grilled chicken
    • Fried chicken
    • Suyuk
    • Jeyuk Bokkeum
    • Bibimbap
    • Rice bowls
    • Fried rice
    • Grilled fish
    • Rich or oily foods

    They are especially good with meat because the sweet and tangy brine cuts through heaviness and refreshes the palate.


    Storage Tips

    Store the pickled onions in an airtight glass container in the refrigerator.

    They are best eaten within 1 to 2 weeks.

    Always use clean utensils when taking onions out of the jar.

    If the brine becomes cloudy, smells unusual, or the texture changes unpleasantly, discard it.

    For the best texture, keep the onions refrigerated and serve them cold.


    Frequently Asked Questions

    Can I eat pickled onions right away?

    You can eat them after they cool, but they taste better after resting in the refrigerator for one day.

    This gives the onions time to absorb the brine.


    Why do I need to pour the brine while hot?

    Hot brine helps the onions stay crisp and absorb flavor more quickly.

    It also slightly softens the sharp raw onion taste.


    Can I use red onions?

    Yes.

    Red onions can be used, but they may change the color of the brine slightly.

    They also give a slightly different flavor.


    Can I add chili peppers?

    Yes.

    You can add sliced green chili peppers, red chili peppers, or Cheongyang chili peppers for a spicy version.


    Can I reduce the sugar?

    Yes.

    You can reduce the sugar slightly, but the flavor will become sharper and less balanced.

    The sweetness helps balance the soy sauce and vinegar.


    Can I reuse the brine?

    It is not recommended to reuse the brine repeatedly.

    For the cleanest flavor and safest storage, make a fresh batch when making new pickles.


    How long do Korean pickled onions last?

    They usually keep well in the refrigerator for about 1 to 2 weeks.

    The texture is best during the first several days.


    Final Thoughts

    Korean pickled onions are one of the easiest side dishes you can make with just onions, soy sauce, vinegar, sugar, and water.

    The simple 2:1:1:1 brine ratio makes this recipe easy to remember and easy to adjust.

    Crisp, sweet, tangy, and savory, these pickled onions are perfect with Korean BBQ, grilled meat, rice bowls, and everyday Korean meals.

    If you want a quick Korean side dish that refreshes the palate and pairs beautifully with rich foods, this Korean pickled onion recipe is a perfect choice.

  • Yeolmu Kimchi Recipe (Young Summer Radish Kimchi)

    Yeolmu Kimchi Recipe (Young Summer Radish Kimchi)

    Yeolmu Kimchi is a refreshing Korean kimchi made with young summer radish greens, onion, red chili peppers, garlic, ginger, fish sauce, salted shrimp, and a light flour paste.

    It has a bright, clean, slightly spicy, and refreshing flavor. Unlike napa cabbage kimchi, Yeolmu Kimchi is lighter and often enjoyed during warm weather because of its crisp texture and cool, refreshing taste.

    This kimchi tastes delicious with steamed rice, noodles, bibimbap, and Korean soups. After fermenting for 1 to 2 days at room temperature, it develops a deeper, tangier flavor and becomes even better chilled.


    What is Yeolmu Kimchi?

    Yeolmu Kimchi is a Korean kimchi made with young radish greens.

    The word “yeolmu” refers to young summer radish greens, and “kimchi” refers to Korean fermented seasoned vegetables.

    Yeolmu Kimchi is especially popular in spring and summer. It is lighter, fresher, and more refreshing than many heavier kimchi varieties.

    It can be eaten as a side dish, mixed into bibimbap, or served with cold noodles such as bibim guksu or naengmyeon.


    Recipe Information

    Prep Time: 40 to 60 minutes

    Cook Time: 5 minutes

    Total Time: About 1 hour

    Servings: 6 or more

    Difficulty: Easy to Moderate

    Cuisine: Korean

    Main Ingredient: Young summer radish greens

    Best Served As: Korean kimchi side dish


    Ingredients

    Main Ingredients

    1.4kg trimmed young summer radish greens

    3/4 cup coarse salt

    3 cups water for salting

    1/2 large onion, sliced

    1 handful green onion, chopped

    For the Blended Mixture

    1 onion

    1/2 medium apple

    5 red chili peppers

    Flour paste

    For the Flour Paste

    1 cup water

    1 tbsp flour

    1/2 cup water for mixing the flour

    Seasoning Ingredients

    4 tbsp minced garlic

    1/2 tbsp minced ginger

    6 to 7 tbsp gochugaru

    3 tbsp Korean plum extract

    5 tbsp fish sauce

    3 tbsp salted shrimp

    Salt, to taste


    Ingredient Notes

    Young Summer Radish Greens

    Young summer radish greens are tender, crisp, and slightly peppery.

    They are more delicate than napa cabbage, so handle them gently after salting and rinsing.


    Coarse Salt

    Coarse salt is used to lightly wilt and season the radish greens.

    Do not rub the greens too aggressively, or they can become bruised and soft.


    Flour Paste

    Flour paste helps the seasoning stick to the greens.

    It also supports fermentation and gives the kimchi a smoother texture.


    Apple

    Apple adds natural sweetness and a clean fruity flavor.

    It helps balance the saltiness from the fish sauce and salted shrimp.


    Red Chili Peppers

    Fresh red chili peppers add color, freshness, and mild heat.

    They also make the kimchi sauce taste lighter and more refreshing than using only gochugaru.


    Fish Sauce and Salted Shrimp

    Fish sauce and salted shrimp add deep umami flavor.

    They are essential for creating a rich, traditional kimchi taste.


    Korean Plum Extract

    Korean plum extract adds sweetness and mild acidity.

    It helps round out the flavor of the kimchi seasoning.


    How to Make Yeolmu Kimchi

    Step 1: Trim and Wash the Radish Greens

    Trim the young summer radish greens.

    Remove any damaged or yellow leaves.

    Wash them gently under running water to remove dirt.

    Drain lightly.


    Step 2: Salt the Radish Greens

    Place the radish greens in a large bowl or basin.

    Sprinkle coarse salt between the layers.

    Pour in about 3 cups of water.

    Let them salt for 40 minutes to 1 hour.

    During this time, turn the greens gently once or twice so they salt evenly.


    Step 3: Make the Flour Paste

    Bring 1 cup of water to a boil in a small pot.

    In a separate bowl, mix 1 tablespoon of flour with 1/2 cup of water until smooth.

    Pour the flour mixture into the boiling water.

    Stir continuously and cook until slightly thickened.

    Remove from heat and let it cool completely.


    Step 4: Prepare the Blended Mixture

    Cut the onion and apple into large pieces.

    Add them to a blender with 5 red chili peppers and the cooled flour paste.

    Blend until smooth.

    This mixture becomes the fresh and slightly sweet base of the kimchi seasoning.


    Step 5: Prepare the Vegetables

    Thinly slice 1/2 large onion.

    Chop the green onion.

    Set them aside.


    Step 6: Make the Kimchi Seasoning

    In a large mixing bowl, add the blended mixture.

    Add:

    • 4 tbsp minced garlic
    • 1/2 tbsp minced ginger
    • 6 to 7 tbsp gochugaru
    • 3 tbsp Korean plum extract
    • 5 tbsp fish sauce
    • 3 tbsp salted shrimp

    Mix well until the seasoning is evenly combined.


    Step 7: Rinse the Salted Radish Greens

    After salting, rinse the radish greens about 2 times in clean water.

    Be gentle while rinsing so the greens do not become damaged.

    Drain well.

    Too much remaining water can make the kimchi seasoning watery.


    Step 8: Mix the Radish Greens with the Seasoning

    Place the drained radish greens in a large bowl.

    Add the prepared kimchi seasoning.

    Gently mix until the greens are evenly coated.

    Do not mix too roughly, because young radish greens are delicate.


    Step 9: Add Onion and Green Onion

    Add the sliced onion and chopped green onion.

    Mix gently again.

    Taste the seasoning and adjust with salt if needed.


    Step 10: Store and Ferment

    Transfer the Yeolmu Kimchi to an airtight container.

    Press it down lightly to remove large air pockets.

    Leave it at room temperature for 1 to 2 days.

    Once it begins to ferment and tastes slightly tangy, store it in the refrigerator.

    Serve chilled.


    Pro Tips

    Handle the Greens Gently

    Young summer radish greens are delicate.

    Avoid rubbing, squeezing, or mixing too hard.

    Gentle handling keeps the texture fresh and crisp.


    Do Not Oversalt

    If the greens are salted too long, the kimchi can become too salty and soft.

    Check the texture after 40 minutes.

    The greens should be slightly wilted but not limp.


    Cool the Flour Paste Completely

    Do not add hot flour paste to the seasoning.

    Hot paste can affect the freshness of the vegetables and change the texture.


    Use Apple for Natural Sweetness

    Apple gives the kimchi a cleaner sweetness than sugar alone.

    It also helps the kimchi taste fresher after fermentation.


    Adjust the Final Seasoning with Salt

    Fish sauce and salted shrimp add saltiness, but the final taste can vary depending on the vegetables.

    After mixing, taste the seasoning and adjust with salt if needed.


    Ferment Before Refrigerating

    Leaving the kimchi at room temperature for 1 to 2 days helps the flavor develop.

    Once it tastes slightly tangy, move it to the refrigerator to slow the fermentation.


    What to Serve with Yeolmu Kimchi

    Yeolmu Kimchi pairs well with:

    • Steamed white rice
    • Bibimbap
    • Bibim Guksu
    • Naengmyeon
    • Kongnamul Guk
    • Doenjang Jjigae
    • Kimchi Jjigae
    • Grilled fish
    • Bulgogi
    • Jeyuk Bokkeum
    • Suyuk
    • Korean BBQ

    It is especially delicious when served cold with noodles or mixed into rice.


    Storage Tips

    Store Yeolmu Kimchi in an airtight container in the refrigerator.

    It will continue to ferment slowly as it sits.

    For the freshest taste, enjoy it within 1 to 2 weeks.

    As it becomes more sour, it is excellent for mixing with noodles or bibimbap.

    Always use clean utensils when taking kimchi from the container.


    Frequently Asked Questions

    Can I eat Yeolmu Kimchi right away?

    Yes.

    You can eat it right after making it, but it tastes better after fermenting for 1 to 2 days.


    How long should Yeolmu Kimchi ferment?

    Leave it at room temperature for 1 to 2 days.

    The exact time depends on room temperature.

    When it tastes lightly tangy, move it to the refrigerator.


    Can I skip the flour paste?

    You can, but the seasoning may not cling as well to the greens.

    Flour paste helps create a smoother kimchi seasoning and supports fermentation.


    Can I use pear instead of apple?

    Yes.

    Korean pear or regular pear can be used instead of apple.

    It will give the kimchi a softer, sweeter flavor.


    Why did my Yeolmu Kimchi become too salty?

    The greens may have been salted too long, or too much fish sauce or salted shrimp may have been added.

    Next time, reduce the salting time slightly and adjust the final seasoning more carefully.


    Why did my Yeolmu Kimchi become soft?

    Young radish greens can become soft if they are oversalted or mixed too roughly.

    Handle them gently and avoid salting for too long.


    Can I make Yeolmu Kimchi spicy?

    Yes.

    Add more gochugaru or extra fresh red chili peppers if you prefer a spicier kimchi.


    Final Thoughts

    Yeolmu Kimchi is a refreshing Korean young radish green kimchi with a bright, clean, and lightly spicy flavor.

    With young summer radish greens, onion, apple, red chili peppers, garlic, ginger, fish sauce, salted shrimp, gochugaru, and flour paste, you can make a delicious homemade kimchi that is perfect for warm weather.

    The key is to salt the greens gently, use a flavorful blended seasoning, and let the kimchi ferment briefly before refrigerating.

    If you want a light, crisp, and refreshing Korean kimchi, this Yeolmu Kimchi recipe is a perfect choice.

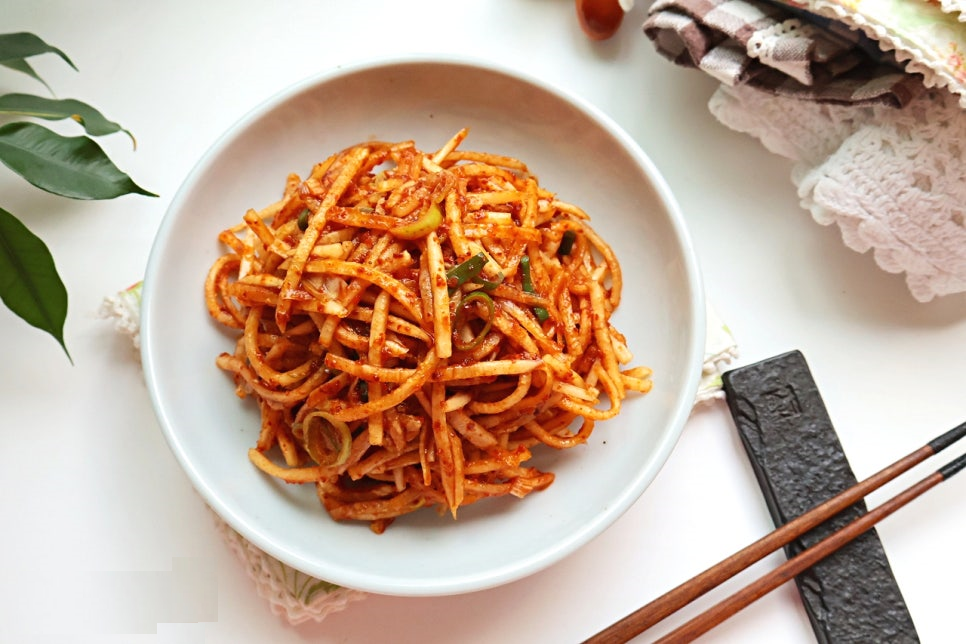
  • Musaengchae Recipe (Korean Spicy Radish Salad)

    Musaengchae Recipe (Korean Spicy Radish Salad)

    Musaengchae is a fresh Korean spicy radish salad made with thinly sliced radish, gochugaru, garlic, vinegar, fish sauce, sugar, and green onion.

    This version is quick, simple, and does not require salting or waiting. You can make it in about 10 to 15 minutes, which makes it a perfect everyday Korean side dish.

    The flavor is spicy, sweet, sour, savory, and refreshing. It goes especially well with steamed rice, grilled meat, bibimbap, Korean soups, and stews.


    What is Musaengchae?

    Musaengchae is a Korean seasoned radish salad.

    The word “mu” means Korean radish, and “saengchae” refers to a fresh, seasoned vegetable dish.

    Unlike radish kimchi, Musaengchae does not need fermentation. It is usually mixed fresh and served right away.

    This dish is popular because it is quick to make, affordable, crunchy, and full of bright flavor.


    Recipe Information

    Prep Time: 10 minutes

    Cook Time: 0 minutes

    Total Time: 10 to 15 minutes

    Servings: 6 or more

    Difficulty: Easy

    Cuisine: Korean

    Main Ingredient: Korean radish

    Best Served As: Korean side dish


    Ingredients

    Main Ingredients

    600g Korean radish

    1 cup chopped green onion

    Sesame seeds, to taste

    Seasoning Ingredients

    2 tbsp gochugaru

    1 tbsp minced garlic

    1 tbsp sugar

    1 tbsp omija syrup or Korean plum extract

    2 tbsp vinegar

    2 tbsp fish sauce

    Salt, to taste


    Ingredient Notes

    Korean Radish

    Korean radish is crisp, slightly sweet, and juicy.

    For the best texture, slice it as thinly as possible. Thin radish strips absorb the seasoning quickly, which is important for this no-salting version.

    You can peel the radish if you prefer a cleaner look, but leaving the skin on is also fine if the radish is well washed.


    Gochugaru

    Gochugaru is Korean red pepper flakes.

    It gives Musaengchae its red color and mild spicy flavor.

    Mixing the radish with gochugaru first helps the radish become evenly coated and beautifully red.


    Fish Sauce

    Fish sauce adds saltiness and umami.

    It gives the salad a deeper Korean flavor than salt alone.

    You can use anchovy fish sauce or sand lance fish sauce.


    Vinegar

    Vinegar gives Musaengchae its refreshing sour taste.

    If you like a stronger tangy flavor, add a little more vinegar at the end.


    Omija Syrup or Plum Extract

    Omija syrup or Korean plum extract adds sweetness and depth.

    If you do not have either, you can use a little more sugar or cooking syrup.


    Green Onion

    Green onion adds freshness and aroma.

    Add it at the end and mix gently so the flavor stays fresh.


    How to Make Musaengchae

    Step 1: Prepare the Radish

    Wash the radish well.

    Peel it if desired.

    Cut the radish into very thin strips.

    The thinner the radish is sliced, the faster it absorbs the seasoning.


    Step 2: Coat with Gochugaru

    Place the sliced radish in a large mixing bowl.

    Add 2 tablespoons of gochugaru.

    Rub and mix the radish with the gochugaru until the radish turns evenly red.

    This step helps the color and flavor spread through the radish.


    Step 3: Add Garlic, Sugar, Syrup, and Vinegar

    Add:

    • 1 tbsp minced garlic
    • 1 tbsp sugar
    • 1 tbsp omija syrup or Korean plum extract
    • 2 tbsp vinegar

    Mix well until the seasonings begin to coat the radish evenly.


    Step 4: Add Fish Sauce and Salt

    Add 2 tablespoons of fish sauce.

    Mix again.

    Taste the radish and adjust the seasoning with salt.

    If it tastes too mild, add a little more salt.

    If you want it more tangy, add a little more vinegar.


    Step 5: Add Green Onion and Sesame Seeds

    Add chopped green onion and sesame seeds.

    Mix gently.

    Do not overmix at this stage, or the radish may release too much water.


    Step 6: Serve

    Transfer the Musaengchae to a serving dish.

    Serve immediately for the freshest and crunchiest texture.


    Pro Tips

    Slice the Radish Thinly

    Thin radish strips absorb seasoning quickly.

    This is especially important because this recipe does not salt the radish first.


    Mix Gochugaru First

    Coating the radish with gochugaru before adding wet seasonings gives the salad a better red color.

    It also helps the seasoning cling to the radish more evenly.


    Do Not Salt the Radish First

    This recipe is designed to be quick.

    Because the radish is sliced thinly and mixed directly with seasoning, there is no need to salt and drain it first.


    Adjust the Sourness

    If you like a brighter, more refreshing flavor, add a little more vinegar.

    If you prefer a softer taste, keep the vinegar amount as written.


    Serve Fresh

    Musaengchae tastes best right after mixing.

    Over time, the radish releases water and the texture becomes softer.


    What to Serve with Musaengchae

    Musaengchae pairs well with:

    • Steamed white rice
    • Bibimbap
    • Bulgogi
    • Jeyuk Bokkeum
    • Grilled pork belly
    • Suyuk
    • Doenjang Jjigae
    • Kimchi Jjigae
    • Miyeokguk
    • Kongnamul Guk
    • Korean BBQ
    • Fried egg

    It is especially good as a topping for bibimbap because it adds crunch, spice, and acidity.


    Storage Tips

    Store leftover Musaengchae in an airtight container in the refrigerator.

    It is best eaten within 2 to 3 days.

    The radish will release water as it sits, so mix it lightly before serving again.

    For the best texture, enjoy it fresh on the day it is made.

    Freezing is not recommended.


    Frequently Asked Questions

    Can I make Musaengchae without salting the radish?

    Yes.

    This recipe is made without salting the radish first.

    The key is to slice the radish thinly so the seasoning absorbs quickly.


    Can I use regular radish instead of Korean radish?

    Yes, but the flavor and texture may be slightly different.

    Korean radish is usually sweeter, juicier, and crunchier.

    If using regular radish, taste and adjust the sugar, vinegar, and salt as needed.


    Is Musaengchae spicy?

    It is mildly spicy.

    You can reduce the gochugaru for a milder version or add more if you prefer it spicier.


    Can I use soy sauce instead of fish sauce?

    You can, but the flavor will be different.

    Fish sauce gives Musaengchae a deeper and more traditional Korean flavor.


    What can I use instead of omija syrup or plum extract?

    You can use more sugar, honey, or cooking syrup.

    Plum extract gives a cleaner sweet-and-sour flavor, but the recipe still works without it.


    Why did my Musaengchae become watery?

    Radish naturally releases water after being mixed with salt, fish sauce, and vinegar.

    This is normal.

    For the crunchiest texture, serve it soon after making it.


    Final Thoughts

    Musaengchae is one of the easiest Korean radish side dishes you can make at home.

    This no-salting version is fast, fresh, crunchy, and ready in about 10 to 15 minutes.

    With Korean radish, gochugaru, garlic, vinegar, fish sauce, sugar, green onion, and sesame seeds, you can make a spicy, sweet, sour, and savory Korean banchan that goes perfectly with rice.

    If you want a quick Korean side dish that is refreshing, flavorful, and easy enough for everyday meals, this Musaengchae recipe is a perfect choice.

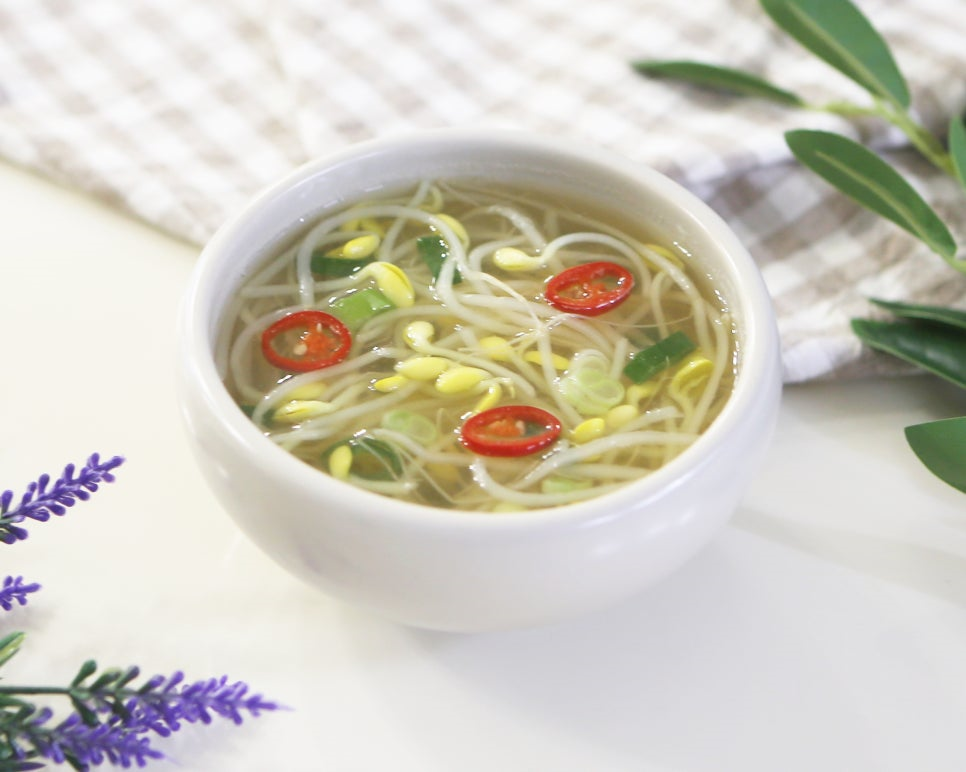
  • Kongnamul Guk Recipe (Korean Soybean Sprout Soup)

    Kongnamul Guk Recipe (Korean Soybean Sprout Soup)

    Kongnamul Guk is a clear Korean soybean sprout soup with a clean, refreshing broth.

    It is light, simple, and perfect when you want a warm soup that does not feel heavy.

    The key to making this soup taste deeper is to use anchovy-kelp broth together with water instead of using only plain water.

    Seasoning the soup with Korean soup soy sauce and anchovy fish sauce gives it a clean, savory, and refreshing flavor.


    What is Kongnamul Guk?

    Kongnamul Guk is a traditional Korean soup made with soybean sprouts.

    The word “kongnamul” means soybean sprouts, and “guk” means soup.

    This soup is commonly served with rice, kimchi, and simple Korean side dishes.

    It is especially loved for its clean broth and refreshing taste.

    In Korea, Kongnamul Guk is also popular as a light breakfast soup or a soothing soup after drinking alcohol.


    Recipe Information

    Prep Time: 5 minutes

    Cook Time: 10 minutes

    Total Time: 15 minutes

    Servings: 4

    Difficulty: Easy

    Cuisine: Korean

    Main Ingredient: Soybean sprouts

    Best Served With: Steamed rice and kimchi


    Ingredients

    Main Ingredients

    250g soybean sprouts, about 4 handfuls

    5 tbsp chopped green onion

    500ml anchovy-kelp broth

    700ml water

    1/2 tbsp minced garlic

    1 tbsp Korean soup soy sauce

    1 tbsp anchovy fish sauce

    About 1/3 tbsp salt, or to taste

    Optional: sliced Cheongyang chili pepper for a spicy version


    Ingredient Notes

    Soybean Sprouts

    Soybean sprouts are the main ingredient of this soup.

    Use fresh soybean sprouts with firm stems and yellow heads.

    Remove any yellowed or wilted parts before cooking.


    Anchovy-Kelp Broth

    Anchovy-kelp broth gives the soup a deeper and cleaner savory flavor.

    Using only water can make the soup taste flat, but using broth and water together creates a more balanced flavor.


    Korean Soup Soy Sauce

    Korean soup soy sauce adds saltiness and depth without making the broth too dark.

    It is commonly used in Korean soups and stews.


    Anchovy Fish Sauce

    Anchovy fish sauce adds a clean umami flavor to the broth.

    You can also use sand lance fish sauce or finely chopped salted shrimp instead.


    Green Onion

    Green onion adds freshness and aroma to the soup.

    Add it near the end so the flavor stays fresh.


    How to Make Kongnamul Guk

    Step 1: Clean the Soybean Sprouts

    Remove any yellowed parts, loose skins, or damaged soybean sprouts.

    Rinse the soybean sprouts two or three times under cold running water.

    Drain them in a strainer.


    Step 2: Prepare the Broth

    Prepare 500ml of anchovy-kelp broth.

    If you do not have homemade broth, you can use a simple anchovy broth pack.


    Step 3: Add Soybean Sprouts and Liquid to the Pot

    Place the washed soybean sprouts in a pot.

    Add 500ml anchovy-kelp broth and 700ml water.

    This broth-to-water ratio gives the soup a clean but flavorful taste.


    Step 4: Boil with the Lid Open

    Turn the heat to high and bring the soup to a boil.

    Once it starts boiling, reduce the heat to medium-low.

    Boil for about 5 minutes.

    Keep the lid open from the beginning to the end.

    This helps prevent an unpleasant bean-like smell.


    Step 5: Add Seasonings

    After 5 minutes, add minced garlic, chopped green onion, Korean soup soy sauce, and anchovy fish sauce.

    Use 1/2 tbsp minced garlic, 5 tbsp chopped green onion, 1 tbsp Korean soup soy sauce, and 1 tbsp anchovy fish sauce.

    Bring the soup back to a boil once more.


    Step 6: Adjust the Seasoning

    Taste the soup.

    If it tastes too mild, add salt little by little.

    About 1/3 tablespoon of salt is usually enough, but adjust it to your taste.


    Step 7: Add Optional Chili Pepper

    If you like a spicy and sharper flavor, add sliced Cheongyang chili pepper.

    This gives the soup a refreshing spicy kick.


    Step 8: Serve

    Turn off the heat and serve the soup hot.

    Serve with steamed rice, kimchi, and simple Korean side dishes.


    Pro Tips

    Use Both Broth and Water

    Do not make this soup with only plain water if you want a deeper flavor.

    Using half broth and half water gives the soup a clean and savory taste.


    Keep the Lid Open

    When cooking soybean sprout soup, either keep the lid closed the whole time or open the whole time.

    For this recipe, keep the lid open from the beginning.

    Opening and closing the lid during cooking can cause a strong bean smell.


    Add Garlic and Green Onion After Boiling

    Adding garlic and green onion after the soybean sprouts cook briefly keeps the broth clean and fresh.


    Adjust Salt at the End

    Soup soy sauce and fish sauce already add saltiness.

    Taste the soup first, then add salt only if needed.


    Add Chili Pepper for a Spicy Version

    Cheongyang chili pepper makes the soup spicy, clean, and refreshing.

    This is especially good when serving the soup as a hangover soup.


    What to Serve with Kongnamul Guk

    Kongnamul Guk pairs well with simple Korean meals.

    • Steamed white rice
    • Kimchi
    • Gamja Jorim
    • Dubu Jorim
    • Kkaennip Kimchi
    • Gyeran Jjim
    • Grilled fish
    • Jeyuk Bokkeum
    • Bulgogi

    Storage Tips

    Store leftover Kongnamul Guk in an airtight container in the refrigerator.

    It is best eaten within 2 days.

    Reheat it in a pot over medium heat until fully hot.

    Soybean sprouts can become soft over time, so this soup tastes best when freshly made.

    Freezing is not recommended because the texture of soybean sprouts can become unpleasant after thawing.


    Frequently Asked Questions

    Can I make Kongnamul Guk with only water?

    Yes, but the flavor will be lighter.

    For a deeper and cleaner taste, use anchovy-kelp broth together with water.


    Can I use fish sauce instead of soup soy sauce?

    You can, but using both soup soy sauce and fish sauce gives better balance.

    Soup soy sauce gives clean saltiness, while fish sauce adds umami.


    Can I use sand lance fish sauce instead of anchovy fish sauce?

    Yes. Sand lance fish sauce works well.

    You can also use finely chopped salted shrimp for a different savory flavor.


    Why does my soybean sprout soup smell unpleasant?

    This often happens when the lid is opened and closed during cooking.

    Keep the lid open the entire time, or keep it closed the entire time.

    For this recipe, keeping the lid open is the easiest method.


    Can I make it spicy?

    Yes. Add sliced Cheongyang chili pepper near the end.

    It makes the soup taste sharper and more refreshing.


    How long should I boil soybean sprouts?

    Boil them for about 5 minutes first, then add the seasonings and boil briefly again.

    Overcooking can make the soybean sprouts too soft.


    Final Thoughts

    Kongnamul Guk is one of the simplest and most refreshing Korean soups.

    With soybean sprouts, anchovy-kelp broth, soup soy sauce, fish sauce, garlic, and green onion, you can make a clean and deeply satisfying soup in just 15 minutes.

    The key is to use broth instead of only water, keep the lid open while boiling, and adjust the final seasoning with salt.

    If you want a light, clean, and comforting Korean soup, this Kongnamul Guk recipe is a perfect choice.

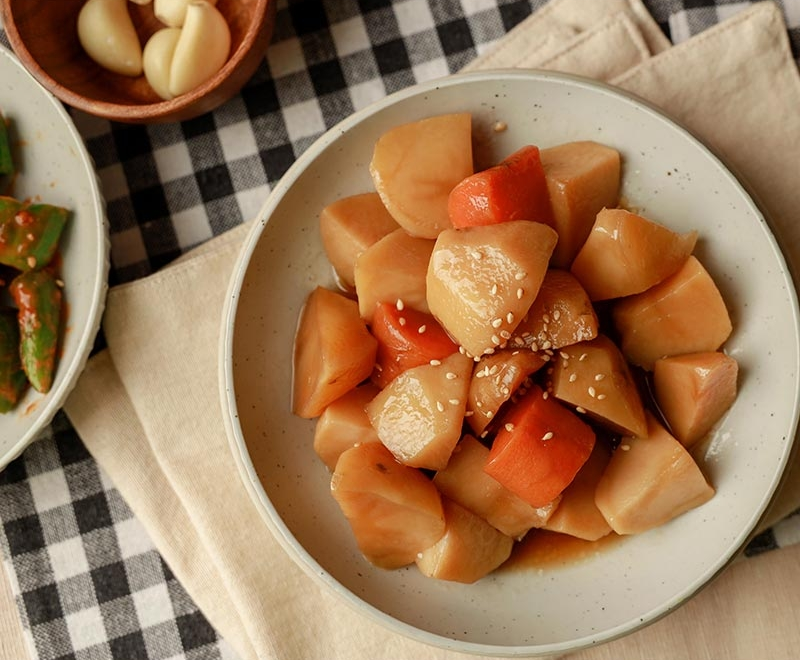
  • Gamja Jorim Recipe (Korean Soy-Braised Potatoes)

    Gamja Jorim Recipe (Korean Soy-Braised Potatoes)

    Gamja Jorim is a classic Korean potato side dish made by braising potatoes in a sweet and savory soy sauce glaze.

    This version is especially chewy and flavorful because it is made without adding extra water. Instead, the potatoes are first mixed with sugar, oligosaccharide syrup, and plum extract. As the potatoes rest, they naturally release moisture, creating just enough liquid for braising.

    The result is glossy, chewy, sweet, salty, and deeply satisfying Korean soy-braised potatoes that pair perfectly with steamed rice.

    What is Gamja Jorim?

    Gamja Jorim means Korean braised potatoes.

    The word “gamja” means potato, and “jorim” refers to a Korean cooking method where ingredients are simmered or braised in a seasoned sauce.

    Gamja Jorim is one of the most popular Korean banchan, or side dishes. It is commonly served in Korean home meals, lunch boxes, and casual restaurants.

    This dish is usually made with potatoes, soy sauce, sugar, syrup, sesame oil, and sesame seeds. It is simple, affordable, and very comforting.

    Recipe Information

    • Prep Time: 15 minutes
    • Cook Time: 15 minutes
    • Total Time: 30 minutes
    • Servings: 4
    • Difficulty: Easy
    • Cuisine: Korean
    • Main Ingredient: Potato
    • Best Served As: Korean side dish

    Ingredients

    Main Ingredients

    • 3 potatoes
    • 1 tbsp oligosaccharide syrup or corn syrup
    • 1 tbsp sugar
    • 1 tbsp Korean plum extract
    • 2 1/2 tbsp soy sauce
    • A small amount of green onion
    • Sesame oil, to taste
    • Sesame seeds, to taste

    Ingredient Notes

    Potatoes

    Use firm potatoes that hold their shape well.

    Cutting the potatoes into similar-sized cubes helps them cook evenly.

    Oligosaccharide Syrup

    Oligosaccharide syrup adds sweetness and gives the potatoes a glossy finish.

    You can use corn syrup or Korean cooking syrup instead.

    Sugar

    Sugar helps draw moisture out of the potatoes before cooking.

    This is what allows the potatoes to braise without adding water.

    Korean Plum Extract

    Korean plum extract adds a gentle sweetness and a slightly fruity depth.

    If you do not have it, you can replace it with a little more syrup or sugar.

    Soy Sauce

    Soy sauce gives the dish its salty and savory flavor.

    Start with 2 tablespoons, then add more near the end if needed.

    Sesame Oil

    Sesame oil is added at the end for aroma.

    Do not add it too early because the fragrance is best when added after cooking.

    How to Make Gamja Jorim

    Step 1: Cut the Potatoes

    Peel the potatoes and cut them into bite-sized cubes.

    Try to keep the pieces similar in size so they cook evenly.

    Step 2: Soak the Potatoes

    Place the cut potatoes in cold water for about 10 minutes.

    This removes excess starch and helps prevent the potatoes from becoming too sticky.

    Rinse and drain well.

    Step 3: Add Sweeteners First

    Place the drained potatoes in a bowl.

    Add:

    • 1 tbsp sugar
    • 1 tbsp oligosaccharide syrup
    • 1 tbsp Korean plum extract

    Mix well so the potatoes are evenly coated.

    Let them sit for about 10 minutes.

    During this time, the potatoes will naturally release moisture.

    This liquid becomes the base for braising, so there is no need to add water.

    Step 4: Start Cooking

    Transfer the potatoes and the liquid they released into a pot.

    Turn the heat to medium.

    Cover with a lid and cook for about 5 minutes.

    Step 5: Stir Gently

    After 5 minutes, open the lid.

    Gently stir the potatoes so they do not stick to the bottom.

    Be careful not to break them.

    Step 6: Add Soy Sauce

    When the potatoes are about 80% cooked, add soy sauce.

    Start with 2 tablespoons first.

    Continue simmering until the potatoes absorb the sauce and the liquid reduces.

    Taste near the end and add the remaining 1/2 tablespoon soy sauce if needed.

    Step 7: Reduce the Sauce

    Continue cooking while gently shaking the pot from time to time.

    Avoid stirring too aggressively because the potatoes can break apart.

    Cook until the sauce becomes thick and glossy.

    Step 8: Add Green Onion

    Add chopped green onion near the end.

    Simmer briefly until the green onion softens slightly and blends into the sauce.

    Step 9: Finish with Sesame Oil and Sesame Seeds

    Turn off the heat.

    Add a little sesame oil and sprinkle sesame seeds over the potatoes.

    Mix gently once more.

    Step 10: Serve

    Transfer the Gamja Jorim to a serving dish.

    Serve warm, at room temperature, or chilled.

    Pro Tips

    Do Not Add Water

    The key point of this recipe is to let the potatoes release their own moisture.

    Sugar, syrup, and plum extract draw out natural liquid from the potatoes, creating a thicker and more flavorful glaze.

    Soak the Potatoes First

    Soaking removes excess starch.

    This helps the potatoes keep their shape and prevents the sauce from becoming too cloudy.

    Add Soy Sauce Later

    If soy sauce is added too early, the potatoes may become too salty before they are fully cooked.

    Add it when the potatoes are about 80% cooked.

    Shake the Pot Instead of Stirring Too Much

    Potatoes can break apart easily.

    Instead of stirring hard, gently shake the pot while reducing the sauce.

    Adjust the Soy Sauce to Taste

    The size and starchiness of potatoes can vary.

    Start with less soy sauce and add more near the end if needed.

    What to Serve with Gamja Jorim

    Gamja Jorim pairs well with:

    • Steamed white rice
    • Kimchi
    • Bulgogi
    • Jeyuk Bokkeum
    • Suyuk
    • Doenjang Jjigae
    • Miyeokguk
    • Korean rolled omelet
    • Grilled fish
    • Roasted seaweed

    It is also a great side dish for lunch boxes because it tastes good even at room temperature.

    Storage Tips

    Store leftover Gamja Jorim in an airtight container in the refrigerator.

    It will keep well for up to 3 days.

    You can eat it cold, at room temperature, or lightly reheated.

    If reheating, warm it gently in a pan over low heat.

    Add a very small splash of water only if the glaze is too thick.

    Frequently Asked Questions

    Can I make Gamja Jorim without plum extract?

    Yes.

    You can replace plum extract with a little more syrup or sugar.

    The flavor will be slightly different but still delicious.

    Why is this recipe made without water?

    The potatoes release moisture after being mixed with sugar, syrup, and plum extract.

    That natural liquid helps create a thicker and more flavorful sauce.

    Why are my potatoes breaking apart?

    They may have been stirred too much or cooked too long.

    Cut the potatoes into even pieces and gently shake the pot instead of stirring aggressively.

    Can I use baby potatoes?

    Yes.

    Baby potatoes work very well for Gamja Jorim.

    You may need to increase the cooking time slightly depending on their size.

    Is Gamja Jorim spicy?

    No.

    This version is not spicy. It is sweet, salty, savory, and slightly nutty.

    Can I make this ahead of time?

    Yes.

    Gamja Jorim is a great make-ahead side dish and keeps well in the refrigerator for a few days.

    Final Thoughts

    Gamja Jorim is one of the easiest and most comforting Korean potato side dishes.

    This no-water method makes the potatoes chewy, glossy, and full of sweet-savory flavor.

    With just potatoes, soy sauce, sugar, syrup, plum extract, green onion, sesame oil, and sesame seeds, you can make a simple Korean banchan that tastes perfect with rice.

    If you want an easy Korean side dish that is affordable, satisfying, and great for meal prep, this Gamja Jorim recipe is a perfect choice.
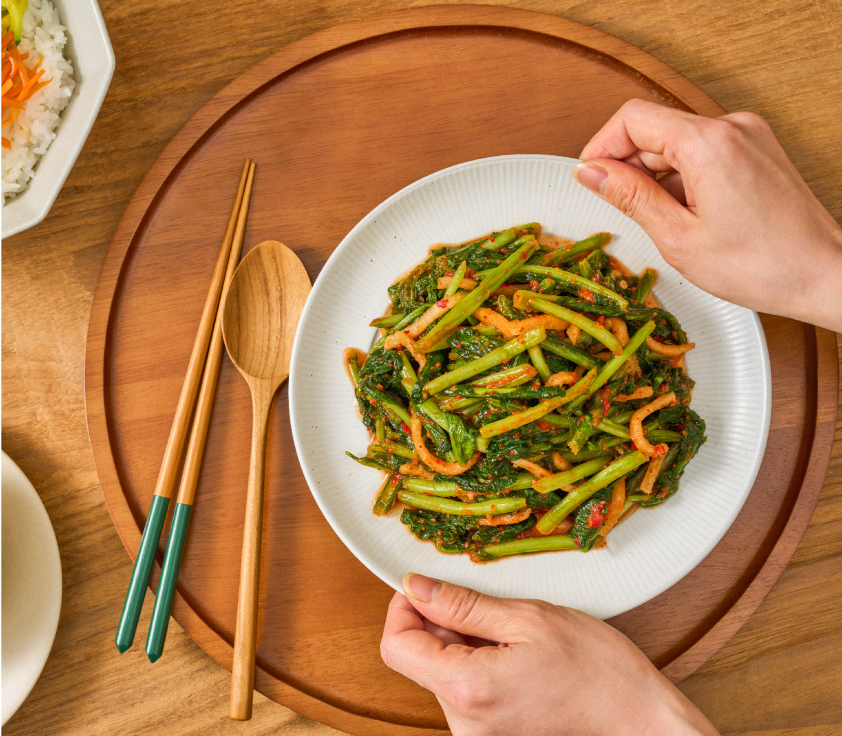
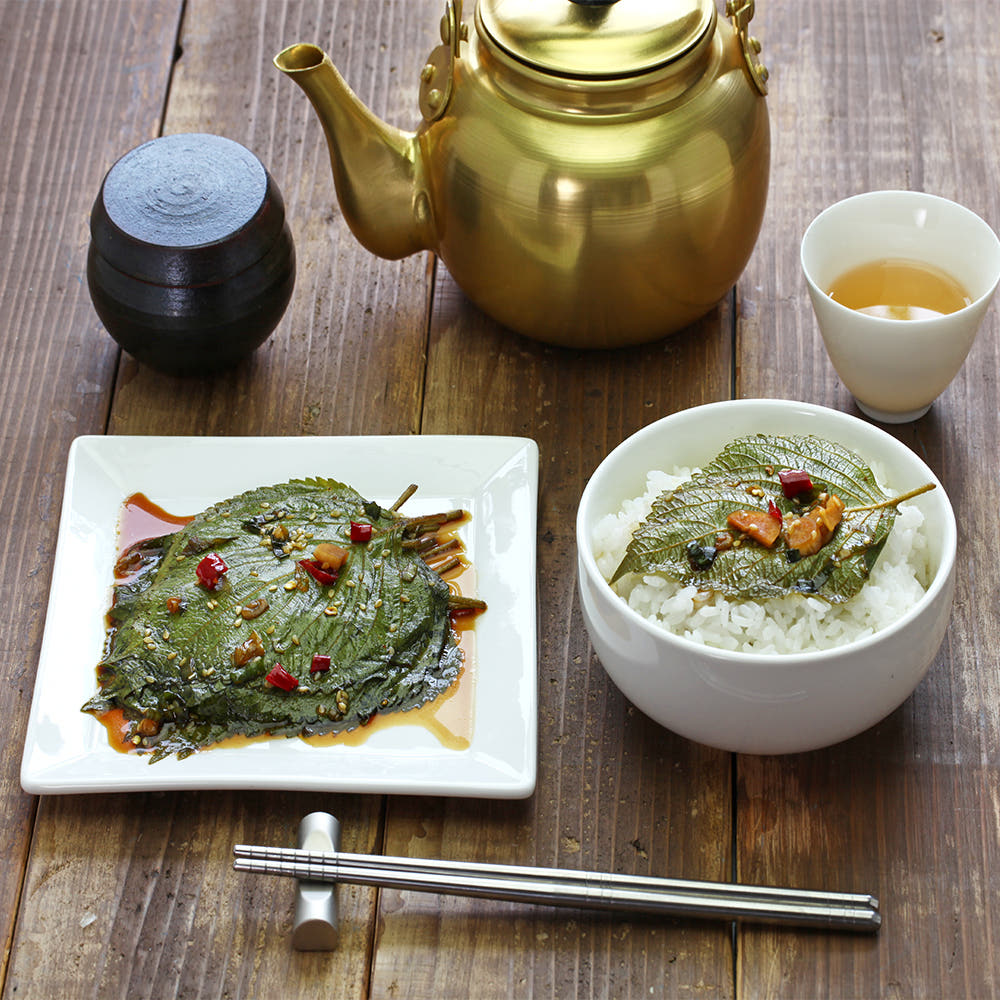
  • Kkaennip Kimchi Recipe (Korean Perilla Leaf Kimchi)

    Kkaennip Kimchi Recipe (Korean Perilla Leaf Kimchi)

    Kkaennip Kimchi is a flavorful Korean side dish made with fresh perilla leaves layered with a savory, spicy, slightly sweet soy-based seasoning sauce.

    Each perilla leaf is coated with a mixture of soy sauce, fish sauce, gochugaru, garlic, onion, carrot, green onion, plum extract, and sesame seeds. The result is bold, aromatic, salty, sweet, and deeply satisfying.

    This Korean perilla leaf kimchi is often called a “rice thief” in Korea because it tastes so good with hot steamed rice.

    What is Kkaennip Kimchi?

    Kkaennip Kimchi means Korean perilla leaf kimchi.

    The word “kkaennip” means perilla leaf, and “kimchi” refers to Korean seasoned or fermented vegetables.

    Unlike napa cabbage kimchi, Kkaennip Kimchi does not require long fermentation. It can be eaten right away, but the flavor becomes deeper after resting in the refrigerator.

    Perilla leaves have a unique herbal, slightly minty, and earthy aroma. When they are layered with spicy soy seasoning, they become one of the most addictive Korean side dishes.

    Recipe Information

    • Prep Time: 30 minutes
    • Cook Time: 0 minutes
    • Total Time: 30 minutes
    • Servings: 6 or more
    • Difficulty: Easy
    • Cuisine: Korean
    • Main Ingredient: Perilla leaves
    • Best Served With: Steamed rice

    Ingredients

    Main Ingredients

    • 80 to 100 perilla leaves
    • 1 onion
    • 1/2 carrot
    • 5 green onions or chives
    • 5 garlic cloves
    • Sesame seeds, to taste

    For the Seasoning Sauce

    • 10 tbsp soy sauce
    • 3 tbsp fish sauce
    • 2 tbsp oligosaccharide syrup or corn syrup
    • 3 tbsp Korean plum extract
    • 5 tbsp gochugaru

    Ingredient Notes

    Perilla Leaves

    Perilla leaves have a strong herbal aroma and are commonly used in Korean cooking.

    Choose fresh leaves that are green, fragrant, and not wilted.

    Soy Sauce

    Soy sauce creates the salty and savory base of the seasoning.

    Because this recipe uses a generous amount, the sauce is meant to season many layers of leaves.

    Fish Sauce

    Fish sauce adds deep umami flavor.

    It makes the kimchi taste richer and more traditional.

    Gochugaru

    Gochugaru gives the seasoning its red color and mild spicy flavor.

    Use Korean red pepper flakes for the best result.

    Plum Extract

    Korean plum extract adds sweetness and depth.

    If you do not have it, you can use a little more syrup or sugar, but plum extract gives a cleaner flavor.

    Onion and Carrot

    Thinly sliced onion and carrot add texture, sweetness, and freshness to the sauce.

    They also help balance the saltiness.

    How to Make Kkaennip Kimchi

    Step 1: Wash the Perilla Leaves

    Wash the perilla leaves carefully under running water.

    Gently shake off excess water.

    Place them in a strainer and let them drain well.

    The leaves should be clean but not too wet before layering.

    Step 2: Prepare the Vegetables

    Thinly slice the onion.

    Julienne the carrot.

    Chop the green onions or chives.

    Mince or finely crush the garlic.

    If you like extra spice, you can also add thinly sliced red or green chili peppers.

    Step 3: Make the Seasoning Sauce

    In a mixing bowl, combine:

    • 10 tbsp soy sauce
    • 3 tbsp fish sauce
    • 2 tbsp oligosaccharide syrup or corn syrup
    • 3 tbsp Korean plum extract
    • 5 tbsp gochugaru
    • Minced garlic
    • Sesame seeds

    Mix well until everything is evenly combined.

    Step 4: Add the Vegetables to the Sauce

    Add the sliced onion, carrot, green onion, and optional chili peppers to the seasoning sauce.

    Mix well.

    The vegetables should be evenly coated with the sauce.

    Step 5: Layer the Perilla Leaves

    Place 2 perilla leaves at a time into an airtight container.

    Spread a small amount of seasoning sauce over the leaves.

    Repeat the process:

    • 2 perilla leaves
    • A little seasoning sauce
    • 2 more perilla leaves
    • More sauce

    Continue until all the perilla leaves are used.

    Layering 2 leaves at a time helps prevent the kimchi from becoming too salty.

    Step 6: Press Gently

    After layering, gently press the leaves down with a spoon.

    This helps the seasoning spread evenly.

    Pour any remaining sauce over the top.

    Step 7: Rest and Serve

    You can serve Kkaennip Kimchi right away.

    For deeper flavor, refrigerate it for a few hours before eating.

    It tastes even better after the perilla leaves absorb the seasoning.

    Pro Tips

    Drain the Leaves Well

    Too much water on the perilla leaves can dilute the seasoning.

    After washing, drain them well before adding the sauce.

    Layer Two Leaves at a Time

    If you season each leaf one by one, the kimchi can become too salty.

    Layering two leaves at a time creates a better balance.

    Taste the Sauce First

    Before layering, taste a small amount of the sauce.

    If it tastes too salty, add more onion or a little extra syrup.

    If it tastes too mild, add a small amount of soy sauce or fish sauce.

    Use Fresh Perilla Leaves

    Fresh perilla leaves have the best aroma.

    Avoid leaves that are dry, yellow, or bruised.

    Let It Rest

    Kkaennip Kimchi can be eaten immediately, but resting it in the refrigerator helps the flavor become deeper and more balanced.

    What to Serve with Kkaennip Kimchi

    Kkaennip Kimchi pairs well with:

    • Steamed white rice
    • Korean BBQ
    • Suyuk
    • Bulgogi
    • Doenjang Jjigae
    • Kimchi Jjigae
    • Grilled fish
    • Fried egg
    • Roasted seaweed
    • Bibimbap

    The easiest way to enjoy it is to place one seasoned perilla leaf over hot rice and eat it as a wrap.

    Storage Tips

    Store Kkaennip Kimchi in an airtight container in the refrigerator.

    It will keep well for about 5 to 7 days.

    The flavor becomes stronger as it rests.

    If the seasoning becomes too salty over time, eat it with plenty of rice or use it as a topping for rice bowls.

    Frequently Asked Questions

    Can I eat Kkaennip Kimchi right away?

    Yes.

    You can eat it immediately after making it, but it tastes better after resting in the refrigerator for a few hours.

    Is Kkaennip Kimchi fermented?

    It can lightly ferment over time, but it is usually eaten as a quick seasoned kimchi.

    It does not need long fermentation like napa cabbage kimchi.

    Can I make it less salty?

    Yes.

    Layer two or three leaves at a time instead of seasoning every single leaf.

    You can also add more onion or reduce the soy sauce slightly.

    Can I make it without fish sauce?

    Yes.

    You can skip fish sauce and use more soy sauce, but the flavor will be less deep.

    For a vegetarian version, use Korean soup soy sauce or a vegetarian fish sauce alternative.

    How long does Kkaennip Kimchi last?

    It usually keeps well in the refrigerator for 5 to 7 days.

    The leaves will become softer and more flavorful over time.

    Can I freeze Kkaennip Kimchi?

    Freezing is not recommended.

    Perilla leaves lose their texture after freezing and thawing.

    Why is my Kkaennip Kimchi too salty?

    Too much sauce may have been added between the leaves.

    Next time, layer 2 leaves at a time and use a smaller amount of seasoning.

    Final Thoughts

    Kkaennip Kimchi is one of the easiest and most flavorful Korean side dishes you can make at home.

    With fresh perilla leaves and a simple spicy soy-based seasoning, you can create a bold and aromatic banchan that goes perfectly with steamed rice.

    The combination of soy sauce, fish sauce, gochugaru, garlic, plum extract, onion, carrot, and sesame seeds makes every bite savory, spicy, slightly sweet, and deeply satisfying.

    If you want a quick Korean side dish that instantly makes rice taste better, this Kkaennip Kimchi recipe is a perfect choice.

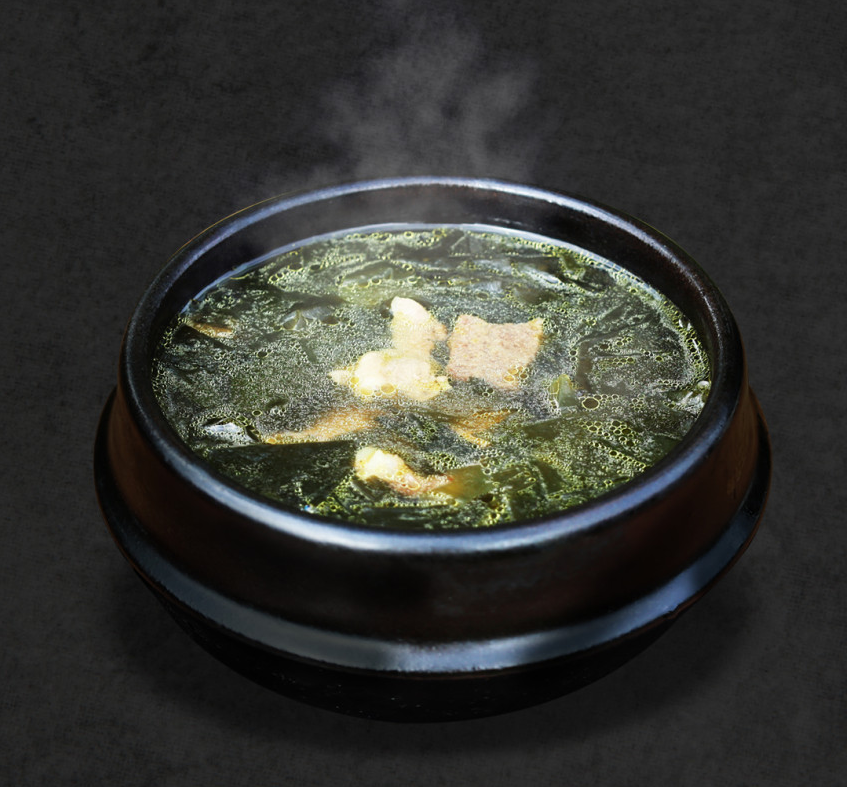
  • Beef Miyeokguk Recipe (Korean Seaweed Soup with Beef)

    Beef Miyeokguk Recipe (Korean Seaweed Soup with Beef)

    Beef Miyeokguk is a classic Korean seaweed soup made with tender beef, soaked seaweed, garlic, sesame oil, Korean soup soy sauce, and a clean, deeply comforting broth.

    This soup is simple, nourishing, and full of gentle savory flavor. In Korea, Miyeokguk is especially known as a birthday soup and a traditional postpartum recovery food, but it is also enjoyed as an everyday home-cooked soup.

    The secret to making a deeper and more flavorful Miyeokguk is to stir-fry the beef, garlic, and seaweed first, then simmer the soup with rice water or the water used to soak the seaweed.

    What is Miyeokguk?

    Miyeokguk means Korean seaweed soup.

    The word “miyeok” means seaweed, and “guk” means soup.

    Miyeokguk is one of the most familiar soups in Korean home cooking. It is commonly made with beef, but it can also be made with seafood, mussels, clams, or even just seaweed.

    Beef Miyeokguk has a clean, savory, slightly nutty flavor from sesame oil and Korean soup soy sauce. It is light but deeply comforting, especially when served with steamed rice and kimchi.

    Recipe Information

    • Prep Time: 10 minutes
    • Cook Time: 50 minutes
    • Total Time: 1 hour
    • Servings: 4
    • Difficulty: Easy
    • Cuisine: Korean
    • Main Ingredient: Seaweed and beef
    • Best Served With: Steamed rice

    Ingredients

    Main Ingredients

    • 180g beef for soup
    • 20g dried miyeok, Korean seaweed
    • 1.4L rice water or plain water
    • 1 tbsp minced garlic
    • 1 tbsp sesame oil
    • 2 tbsp Korean soup soy sauce
    • Salt, to taste

    Ingredient Notes

    Dried Miyeok

    Dried miyeok expands a lot after soaking.

    For 4 servings, about 20g of dried miyeok is enough. If you accidentally soak too much, you can freeze the extra soaked seaweed and use it later.

    Beef

    Use beef labeled for soup or stew.

    If using a larger piece of beef, slice it against the grain. Cutting against the grain helps the beef stay tender instead of chewy.

    Rice Water

    Rice water adds a slightly deeper and softer flavor to the soup.

    If you do not have rice water, plain water is completely fine.

    Seaweed Soaking Water

    Some Korean home cooks use the water from soaking the seaweed to make the broth taste deeper.

    However, depending on the seaweed, this water can sometimes taste slightly bitter or fishy. If you are sensitive to that flavor, use rice water or plain water instead.

    Korean Soup Soy Sauce

    Korean soup soy sauce, called gukganjang, seasons the soup while adding depth.

    It is saltier and more aromatic than regular soy sauce, so use it carefully and adjust the final seasoning with salt.

    How to Make Beef Miyeokguk

    Step 1: Prepare the Beef

    Pat the beef dry with a paper towel to remove excess blood and moisture.

    If the beef is in a large piece, slice it against the grain into bite-sized pieces.

    This helps the beef cook more evenly and stay tender.

    Step 2: Soak the Seaweed

    Place the dried miyeok in a bowl.

    Add about 500ml of water.

    Soak for about 10 minutes, or until the seaweed expands and becomes soft.

    Step 3: Cut the Seaweed

    Drain the soaked seaweed.

    Cut it into bite-sized pieces using kitchen scissors or a knife.

    If you want to use the soaking water for the soup, set it aside. If not, discard it and use rice water or plain water instead.

    Step 4: Stir-Fry the Beef and Garlic

    Heat a pot over medium heat.

    Add 1 tablespoon of sesame oil.

    Add the minced garlic and beef.

    Stir-fry until the surface of the beef is about halfway cooked.

    This step builds the base flavor of the soup.

    Step 5: Add Soup Soy Sauce

    Add 1 tablespoon of Korean soup soy sauce to the beef.

    Stir-fry briefly so the beef absorbs the seasoning.

    Step 6: Add the Seaweed

    Add the soaked and cut seaweed to the pot.

    Stir-fry until the seaweed becomes a deeper green color.

    This step helps the seaweed absorb the sesame oil and beef flavor.

    Step 7: Add the First Amount of Liquid

    Pour in about 400ml of rice water, seaweed soaking water, or plain water.

    Increase the heat to high and bring it to a boil.

    Let the soup boil so the flavor from the beef and seaweed begins to come out.

    Step 8: Add the Remaining Water

    Once the soup begins to boil, add the remaining 1L of water.

    Bring it back to a boil.

    Then reduce the heat to medium-low.

    Step 9: Simmer the Soup

    Simmer for about 15 minutes.

    The longer the soup simmers gently, the deeper and more comforting the broth becomes.

    If you prefer an even richer flavor, you can simmer it for 25 to 30 minutes.

    Step 10: Final Seasoning

    Add the remaining 1 tablespoon of Korean soup soy sauce.

    Taste the soup.

    If it needs more seasoning, add a small amount of salt.

    Do not add too much soy sauce at the end, or the soup color may become too dark.

    Step 11: Serve

    Turn off the heat.

    Serve hot with steamed rice and kimchi.

    Pro Tips

    Stir-Fry the Seaweed First

    Do not simply add seaweed directly into water.

    Stir-frying the seaweed with sesame oil, garlic, and beef gives the soup a deeper and richer flavor.

    Use Rice Water for Depth

    Rice water makes the broth taste softer and slightly fuller.

    It is a simple Korean home-cooking trick for better Miyeokguk.

    Cut Beef Against the Grain

    If you cut beef with the grain, it can become tough.

    Cutting against the grain helps create a softer texture.

    Use Soup Soy Sauce Carefully

    Korean soup soy sauce is salty.

    Use it for flavor, then adjust the final seasoning with salt.

    Simmer Gently

    Miyeokguk tastes better when simmered gently.

    A longer simmer helps the seaweed and beef flavor blend into the broth.

    What to Serve with Beef Miyeokguk

    Beef Miyeokguk pairs well with:

    • Steamed white rice
    • Kimchi
    • Rolled omelet
    • Grilled fish
    • Pan-fried tofu
    • Soy-braised potatoes
    • Cucumber salad
    • Stir-fried anchovies
    • Korean radish kimchi

    For a simple Korean meal, serve it with rice and kimchi.

    Storage Tips

    Store leftover Miyeokguk in an airtight container in the refrigerator.

    It will keep well for up to 3 days.

    To reheat, warm it in a pot over medium heat until hot.

    Miyeokguk often tastes even better the next day because the seaweed and beef flavors continue to deepen.

    If the soup becomes too salty after storage, add a small splash of water while reheating.

    Frequently Asked Questions

    Can I use plain water instead of rice water?

    Yes.

    Rice water adds depth, but plain water works well too.

    Can I use the water from soaking seaweed?

    Yes, but it depends on your taste.

    Some people like the deeper flavor, while others find it slightly bitter or fishy. If unsure, use rice water or plain water.

    What beef cut is best for Miyeokguk?

    Use beef for soup, brisket, flank, or any tender stew-cut beef.

    Thinly sliced beef also works well.

    Can I make Miyeokguk without beef?

    Yes.

    You can make it with clams, mussels, seafood, or simply with seaweed for a lighter version.

    Why is my Miyeokguk bland?

    The soup may need more simmering time, more soup soy sauce, or a little salt.

    Stir-frying the beef and seaweed first also helps create a deeper flavor.

    Why is my beef tough?

    The beef may have been cut with the grain or cooked too aggressively.

    Slice it against the grain and simmer gently.

    Can I freeze Miyeokguk?

    Yes.

    You can freeze Miyeokguk, but the texture of the seaweed may become softer after thawing.

    For best quality, refrigerating and eating within a few days is recommended.

    Final Thoughts

    Beef Miyeokguk is one of the most comforting Korean soups you can make at home.

    With simple ingredients like beef, dried seaweed, sesame oil, garlic, Korean soup soy sauce, and rice water, this soup becomes deeply savory, warm, and satisfying.

    The key steps are simple but important: stir-fry the beef and seaweed first, use rice water or clean water, and simmer gently until the broth becomes rich.

    If you are looking for a classic Korean soup that is nourishing, easy, and full of homemade flavor, this Beef Miyeokguk recipe is a perfect choice.
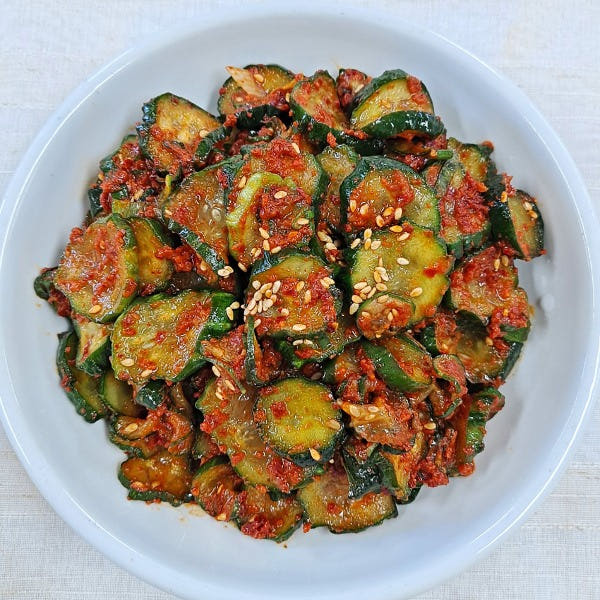
  • Oi Muchim Recipe (Korean Spicy Cucumber Salad)

    Oi Muchim Recipe (Korean Spicy Cucumber Salad)

    Oi Muchim is a quick Korean spicy cucumber salad made with fresh cucumbers, onion, gochujang, gochugaru, vinegar, garlic, sesame oil, and sesame seeds.

    It is crunchy, spicy, sweet, tangy, and refreshing. This easy Korean cucumber side dish takes only about 10 minutes to make and pairs perfectly with rice, grilled meat, noodles, and Korean stews.

    The key to making delicious Oi Muchim is lightly salting the cucumbers first, then squeezing out the excess moisture before mixing them with the sauce. This keeps the cucumbers crisp and prevents the salad from becoming watery.

    What is Oi Muchim?

    Oi Muchim means Korean seasoned cucumber salad.

    The word “oi” means cucumber, and “muchim” refers to a Korean seasoned side dish that is mixed with sauce or seasoning.

    Oi Muchim is a popular Korean banchan, or side dish. It is often served with rice, Korean BBQ, grilled fish, spicy stews, and noodle dishes.

    Unlike cucumber kimchi, Oi Muchim is usually made quickly and eaten fresh.

    Recipe Information

    • Prep Time: 10 minutes
    • Cook Time: 0 minutes
    • Total Time: 10 minutes
    • Servings: 4
    • Difficulty: Easy
    • Cuisine: Korean
    • Main Ingredient: Cucumber
    • Best Served As: Korean side dish

    Ingredients

    Main Ingredients

    • 2 cucumbers
    • 1/2 onion

    For the Sauce

    • 1 tbsp gochujang
    • 1 tbsp gochugaru
    • 1 tbsp sugar
    • 1 tbsp oligosaccharide syrup or corn syrup
    • 1/2 tbsp minced garlic
    • 1 tbsp soy sauce
    • 1.5 tbsp vinegar
    • 1 tbsp sesame oil
    • 1 tbsp sesame seeds

    Ingredient Notes

    Cucumber

    Use fresh, firm cucumbers for the best crunch.

    Korean cucumbers, Persian cucumbers, or English cucumbers all work well.

    Onion

    Onion adds a light sharpness and sweetness.

    Slice it thinly so it blends well with the cucumber.

    Gochujang

    Gochujang is Korean red chili paste.

    It gives the salad a deep spicy and savory flavor.

    Gochugaru

    Gochugaru adds a bright red color and clean chili flavor.

    Using both gochujang and gochugaru gives the sauce better depth.

    Vinegar

    Vinegar gives this cucumber salad its refreshing tangy flavor.

    It balances the sweetness and spice.

    Sesame Oil

    Sesame oil adds a nutty aroma.

    Add it to the sauce for a richer Korean flavor.

    How to Make Oi Muchim

    Step 1: Slice the Cucumbers

    Wash the cucumbers well.

    Slice them into round pieces.

    Keep the slices thick enough to stay crunchy.

    Step 2: Lightly Salt the Cucumbers

    Place the sliced cucumbers in a bowl.

    Sprinkle a small amount of salt over them.

    Let them sit briefly while you prepare the sauce.

    This step helps remove excess moisture and gives the cucumbers a better crunchy texture.

    Step 3: Make the Sauce

    In a mixing bowl, combine:

    • 1 tbsp gochujang
    • 1 tbsp gochugaru
    • 1 tbsp sugar
    • 1 tbsp oligosaccharide syrup or corn syrup
    • 1/2 tbsp minced garlic
    • 1 tbsp soy sauce
    • 1.5 tbsp vinegar
    • 1 tbsp sesame oil
    • 1 tbsp sesame seeds

    Mix well until the sauce is smooth and evenly combined.

    Step 4: Drain the Cucumbers

    Gently squeeze the salted cucumbers to remove excess water.

    Do not crush them too hard.

    Removing moisture helps the sauce stick better and keeps the salad from becoming watery.

    Step 5: Add the Onion

    Thinly slice the onion.

    Add the onion to the cucumbers.

    Step 6: Mix with the Sauce

    Add the prepared sauce to the cucumbers and onion.

    Mix gently until everything is evenly coated.

    Taste and adjust if needed.

    If you prefer a more tangy flavor, add a little more vinegar.

    If you prefer it sweeter, add a little more sugar or syrup.

    Step 7: Serve

    Transfer the Oi Muchim to a serving plate.

    Sprinkle extra sesame seeds on top if desired.

    Serve immediately for the best crunchy texture.

    Pro Tips

    Salt the Cucumbers Briefly

    You do not need to salt them for a long time.

    A short salting while preparing the sauce is enough.

    Squeeze Out the Water

    This is the most important step.

    If the cucumbers are too watery, the sauce will become diluted.

    Serve Fresh

    Oi Muchim tastes best right after mixing.

    The cucumbers will continue to release water as they sit.

    Slice the Onion Thinly

    Thin onion slices mix better with the cucumbers and sauce.

    If your onion tastes too strong, soak it briefly in cold water before using.

    Adjust the Sweet and Sour Balance

    Oi Muchim should taste spicy, sweet, sour, and savory.

    Adjust the vinegar and sugar to match your taste.

    What to Serve with Oi Muchim

    Oi Muchim pairs well with:

    • Steamed white rice
    • Korean BBQ
    • Suyuk
    • Bulgogi
    • Jeyuk Bokkeum
    • Kimchi Jjigae
    • Doenjang Jjigae
    • Bibim Guksu
    • Grilled fish
    • Korean fried chicken

    It is especially good with rich or spicy Korean dishes because the cucumber adds freshness and crunch.

    Storage Tips

    Oi Muchim is best eaten fresh.

    If you have leftovers, store them in an airtight container in the refrigerator for up to 1 day.

    The cucumbers will release more water over time, so the texture may become softer.

    For best results, mix the sauce with the cucumbers right before serving.

    Frequently Asked Questions

    Can I make Oi Muchim ahead of time?

    It is best made right before serving.

    You can prepare the sauce in advance, but mix it with the cucumbers just before eating.

    Do I have to salt the cucumbers?

    Salting is recommended because it removes excess moisture and improves the texture.

    However, if you are in a hurry, you can skip it and serve the salad immediately.

    Is Oi Muchim spicy?

    It is mildly to moderately spicy.

    You can reduce the gochugaru or gochujang for a milder version.

    Can I use English cucumber?

    Yes.

    English cucumber works well because it has a mild flavor and crisp texture.

    Can I make this without gochujang?

    Yes, but the flavor will be lighter.

    You can use more gochugaru, soy sauce, vinegar, sugar, and sesame oil for a simpler version.

    Why did my cucumber salad become watery?

    Cucumbers naturally release water.

    To prevent this, lightly salt the cucumbers and squeeze out the moisture before mixing with the sauce.

    Final Thoughts

    Oi Muchim is one of the easiest and most refreshing Korean cucumber side dishes.

    With just cucumbers, onion, and a simple spicy sweet-and-sour sauce, you can make a crunchy Korean banchan in only 10 minutes.

    The combination of gochujang, gochugaru, vinegar, garlic, sesame oil, and sesame seeds creates a bright and flavorful cucumber salad that goes well with almost any Korean meal.

    If you want a quick Korean side dish that is spicy, tangy, sweet, and refreshing, this Oi Muchim recipe is a perfect choice.

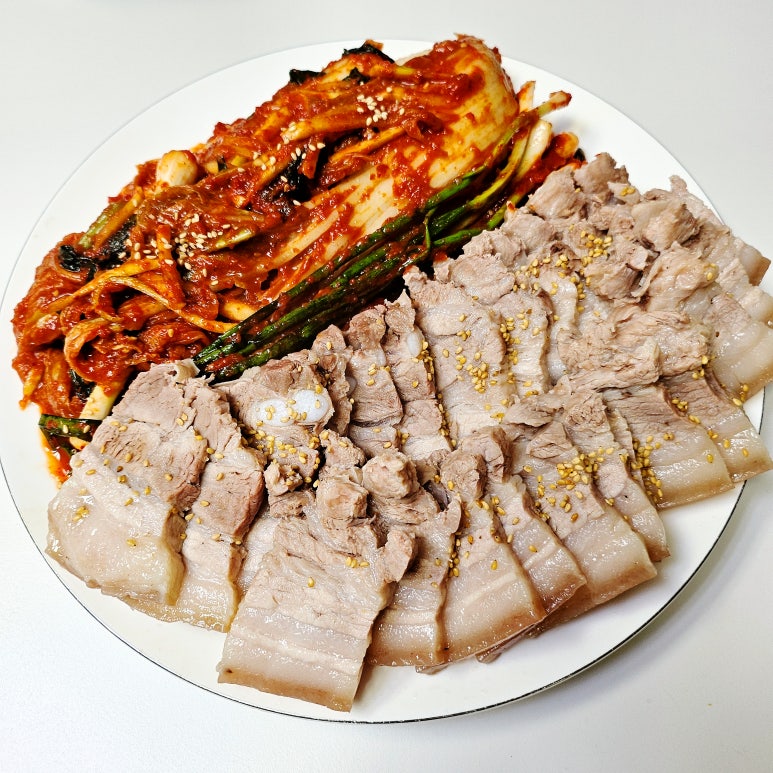
  • Suyuk Recipe (Korean Boiled Pork)

    Suyuk Recipe (Korean Boiled Pork)

    Suyuk is a classic Korean boiled pork dish made by simmering pork with soybean paste, garlic, onion, green onion, bay leaves, black peppercorns, and cooking wine.

    The pork becomes tender, clean-tasting, and flavorful without being greasy. It is often served with bossam kimchi, salted shrimp sauce, garlic, chili peppers, and fresh lettuce or napa cabbage wraps.

    This easy Korean boiled pork recipe is perfect for a comforting meal, a Korean-style gathering, or a simple dish to enjoy with cold beer.

    What is Suyuk?

    Suyuk is Korean boiled pork.

    The word “su” refers to water, and “yuk” means meat. In this dish, pork is gently boiled in seasoned water until tender.

    Suyuk is commonly served as part of Bossam, a Korean pork wrap dish. The sliced pork is wrapped in cabbage, lettuce, or perilla leaves with kimchi, garlic, chili, and sauces.

    Unlike grilled pork, Suyuk has a soft, clean, and mild flavor. The broth ingredients help remove pork odor and add a subtle savory aroma.

    Recipe Information

    • Prep Time: 30 minutes
    • Cook Time: 60 minutes
    • Total Time: 1 hour 30 minutes
    • Servings: 4
    • Difficulty: Easy
    • Cuisine: Korean
    • Main Ingredient: Pork
    • Best Served With: Bossam kimchi or steamed cabbage

    Ingredients

    Main Ingredients

    • 300g pork shoulder, pork front leg, or pork belly
    • Water, enough to fully cover the pork

    For the Boiling Broth

    • 8 whole garlic cloves
    • 1/2 onion
    • 3 tbsp mirim or cooking wine
    • 2 tbsp doenjang, Korean soybean paste
    • 3 bay leaves
    • 8 whole black peppercorns
    • 1/2 green onion

    Ingredient Notes

    Pork

    Pork shoulder or pork front leg is leaner and lighter.

    Pork belly is richer, softer, and fattier.

    Both cuts work well for Suyuk, so choose based on your preference.

    Doenjang

    Doenjang is Korean fermented soybean paste.

    It helps reduce pork odor and gives the pork a subtle savory flavor while boiling.

    Garlic and Onion

    Garlic and onion add sweetness and aroma to the broth.

    They also help make the pork taste cleaner.

    Bay Leaves and Peppercorns

    Bay leaves and whole black peppercorns help remove unwanted pork smell.

    They give the broth a light herbal and spicy aroma.

    Mirim or Cooking Wine

    Mirim helps reduce pork odor and gives the broth a cleaner finish.

    You can also use soju or rice wine.

    How to Make Suyuk

    Step 1: Soak the Pork

    Place the pork in a bowl of cold water.

    Soak for about 30 minutes to remove excess blood.

    This helps create a cleaner-tasting boiled pork.

    Step 2: Prepare the Broth Ingredients

    Prepare the garlic cloves, onion, green onion, bay leaves, peppercorns, doenjang, and mirim.

    Do not add the pork yet.

    Step 3: Boil the Broth First

    Fill a pot with enough water to fully cover the pork later.

    Add:

    • Garlic cloves
    • Onion
    • Green onion
    • Bay leaves
    • Whole black peppercorns
    • Doenjang
    • Mirim

    Bring the water to a strong boil.

    Boiling the broth first helps seal the pork juices when the meat is added.

    Step 4: Prepare the Pork

    If the pork piece is thick, cut it in half so it cooks more evenly.

    Make 2 to 3 shallow cuts in each piece.

    This helps the pork cook through and absorb more aroma from the broth.

    Step 5: Add the Pork

    When the broth is boiling, add the pork.

    Place the pork skin-side down first if using pork belly with skin.

    Make sure the pork is fully submerged in the water.

    Step 6: Boil Over High Heat

    Once the water returns to a boil after adding the pork, cook over high heat for 20 minutes.

    Keep the pot uncovered if you want more pork odor to evaporate.

    Step 7: Simmer Over Medium Heat

    After 20 minutes, reduce the heat to medium.

    Continue boiling for another 20 minutes.

    Turn the pork occasionally so it cooks evenly.

    Step 8: Finish Over Low Heat

    Reduce the heat to low.

    Simmer for about 25 more minutes.

    The total cooking time should be about 1 hour.

    If you want a simpler method, you can simmer the pork over medium heat for about 40 minutes after adding it to boiling water, but the three-stage method gives a more stable result.

    Step 9: Check if the Pork is Cooked

    Insert a chopstick or skewer deep into the thickest part of the pork.

    If no pink or bloody liquid comes out, the pork is fully cooked.

    The pork should be tender but still firm enough to slice.

    Step 10: Slice and Serve

    Remove the pork from the pot.

    Let it rest briefly before slicing.

    Slice the pork into thick, bite-sized pieces.

    Serve warm with kimchi, dipping sauce, and fresh wraps.

    Pro Tips

    Add Pork After the Water Boils

    Do not start the pork in cold water.

    Adding pork to boiling water helps keep the meat juicy and prevents too much flavor from escaping into the broth.

    Keep the Pork Fully Submerged

    The pork should stay covered with water while boiling.

    This helps it cook evenly from the outside to the center.

    Use Doenjang for Better Flavor

    Doenjang is one of the best ingredients for Korean boiled pork.

    It helps remove odor and gives the pork a deeper, more savory taste.

    Cook in Stages

    The recommended cooking method is:

    • High heat: 20 minutes
    • Medium heat: 20 minutes
    • Low heat: 25 minutes

    This helps the pork become tender without becoming dry.

    Rest Before Slicing

    Let the pork rest for a few minutes after boiling.

    This helps keep the meat juicy when sliced.

    Slice Thickly

    Suyuk tastes best when sliced slightly thick.

    Thin slices can dry out faster and may not have the same satisfying texture.

    What to Serve with Suyuk

    Suyuk pairs well with:

    • Bossam kimchi
    • Napa cabbage wraps
    • Lettuce wraps
    • Perilla leaves
    • Salted shrimp sauce
    • Ssamjang
    • Sliced garlic
    • Green chili peppers
    • Kimchi
    • Steamed rice
    • Cold beer

    For a classic Korean meal, serve Suyuk with cabbage wraps, kimchi, garlic, and ssamjang.

    Storage Tips

    Suyuk tastes best when served warm right after cooking.

    If you have leftovers, store them in an airtight container in the refrigerator for up to 3 days.

    To reheat, steam the pork gently or warm it in a pan with a small splash of water.

    Avoid microwaving for too long because the pork can become dry.

    You can also reheat slices briefly in hot broth to keep them moist.

    Frequently Asked Questions

    What cut of pork is best for Suyuk?

    Pork belly, pork shoulder, and pork front leg all work well.

    Pork belly is richer and fattier, while pork shoulder or front leg is leaner.

    Why do you boil the broth before adding pork?

    Adding pork to boiling water helps seal the outside of the meat and keeps the pork juicier.

    It also helps reduce the pork smell.

    Can I make Suyuk without doenjang?

    Yes.

    You can make it without doenjang, but doenjang gives the pork a cleaner and more savory flavor.

    If you skip it, use more garlic, onion, and cooking wine.

    Can I use soju instead of mirim?

    Yes.

    Soju, rice wine, or cooking wine can all be used to help reduce pork odor.

    How do I know when the pork is fully cooked?

    Pierce the thickest part of the pork with a chopstick or skewer.

    If no pink liquid comes out, it is done.

    Why is my Suyuk dry?

    It may have been cooked too long or sliced too thin.

    Use a proper cooking time and let the pork rest before slicing.

    Can I make Suyuk ahead of time?

    Yes, but it is best served warm.

    If making ahead, store it whole or in thick slices, then reheat gently with steam or broth.

    Final Thoughts

    Suyuk is a simple yet deeply satisfying Korean boiled pork dish.

    With pork, doenjang, garlic, onion, green onion, bay leaves, peppercorns, and cooking wine, you can make tender and clean-tasting Korean boiled pork at home.

    The key is to add the pork after the broth is boiling, keep the pork fully submerged, and cook it in stages until tender.

    Serve it with bossam kimchi, cabbage wraps, garlic, and ssamjang for a classic Korean meal that is perfect for family dinners, gatherings, or a relaxing drink at home.